How to practice the immunity sequence at home – covid-19 special

Hi all! I hope you’re all healthy in this time of pandemic. If you are stuck at home or avoiding yoga classes because of covid-19, I made a series of videos showing how you can practice the immunity sequence at home.

Quesaco the immunity sequence? It’s a sequence designed by BKS Iyengar which is supposed to boost immunity.

My problem with it? Most of my students are unable to practice many of the poses in that sequence. So I’ve prepared a couple of videos, vlog-style, which can hopefully help them (and maybe you, reader) get the benefits from the practice, whatever their physical ability, while using whatever they have at home as props.

So here we go, let’s start with 5 minutes of supported uttanasana:


Then we continue with 5 minutes of supported downward facing dog:


Next is 3 minutes of prasarita padottanasana:


Then I will be repeating myself in the video, but if you don’t have a regular headstand practice in a class setting you might be better off simply skipping headstand. However I do give an alternative if you are young and healthy but new to yoga. Please note that you should not be practicing inversions if you have untreated high blood pressure, glaucoma, if you are on your period or if you have a shoulder or neck injury.
Finally, after 5 minutes of headstand comes 10 minutes of headstand cycle which I will no go over in the video as this post is meant moreso for beginners, and beginners aren’t gonna be doing 15 minutes of headstand.


Following headstand comes 5 minutes of supported Viparita Dandasana:


After this comes the Sarvangasana cycle, which lasts in total 20 minutes with 5 minutes of Sarvangasana, 5 minutes of halasana and 10 minutes of variations. Here are two videos; Sarvangasana beginners should only follow the first video while intermediate students can use the second video for help in halasana.


The last pose before Savasana is Viparita Karani (5 minutes):


I hope this was helpful; if so feel free to share with fellow students. Please leave a comment below if you enjoyed it, and if you have other set-ups or anything that might help other people in their home practice.

Stay safe and sane (at least as much as usual!).


A hamstring targeting sequence

Similarly to the low-back pain sequence, this was requested – though this time by students. It is also a relatively short sequence that can be practiced everyday, by anyone, and would take 15 minutes max. The goal here is to become more flexible and lengthen the hamstrings.

You will need: a wall, and a belt. Bolster and blocks not necessary but if you have them I will indicate where you can use them.

Start with your legs up the wall (viparita karani), no bolster under the hips. Press your heels up towards the ceiling and against the wall. Press the ball of the big toe up towards the ceiling. Open the back of the knee, knee caps “up” (towards your hip), bring the back of the thigh towards the wall. Relax the throat and tongue, hands pressing down into the floor by your hips (palms down).

Repeat 5 times with one or two breaths of rest in between (total around 3′).


viparita-karani-legs-up-the-wall-pose

See the space between the back of the thighs and the wall? You want to make that space inexistant so that the whole back of the legs presses against the wall. You can bring the palms of the hands down and press them into the floor.


Bend the knees and slide back towards the center of the room until you are in supta tadasana with both feet pressing against the wall. Grab the belt, bend your right leg and bring the belt over your right foot, then straighten the leg up. Both legs need to be straight, so only get the leg up to 90 degree angle if you can do so with both  legs straight. Otherwise lift the leg up as high as you can without bending either leg. Make sure your left thigh is also going down towards the floor (no gap between the thigh and the floor).


b0950520cc947b1c5ad7e713195041c7--yoga-iyengar-video

Supta Padangusthasana I with the wall and a belt. Both sides of the trunk are even, foot presses against the wall, arrows indicate directionality. Credit: https://www.iyengaryoganotes.com/


Change sides, 1′ each. Repeat both sides once. Repeat again, quickly bring the leg to the left over the midline, grab the belt closer to the foot and then bring the leg out to the left side (Supta Padanghustasana II):


2

If you have a bolster, you can use it for support as demonstrated here. If this is a very difficult pose for you bring the bolster closer to your outer hip. Credit: https://sunfloweryoga.net/


Keep both legs straight, left thigh presses down towards the floor. Stay as long as you can maintain both legs straight. Change sides. Bend your knees to your chest, roll out to the side and come up to standing.

Ardha Uttanasana with the wall (or blocks, 1′ or as long as you can hold it): this is a great demonstration, nothing more to add – please follow these instructions up to point 4! Use the blocks only when you can keep the chest lifted with straight legs:

ardha uttanasana with blocks.JPG


If you have time (optional): Ardha Hanumanasana (half monkey pose or half splits). Kneel onto the mat and bring your hips on top of your knees. Extend your right leg in front of you, heel on the floor – toes up, and slide the leg away from you. Straighten the leg by strongly pressing the heel down into the floor and bringing the knee cap up. Bring the chest slightly forward, back straight. Take support for your hands onto blocks if you have them. Stay 30 seconds up to a minute each side.


And finally, downward facing dog – Adho Mukha Svanasana with the hands up on blocks if you have them and heels up against the wall:


download

Downdog with the heels up against the wall, credits Kasia Zacharko.


modified-downward-facing-dog

Exemple of hands on blocks which you can combine with heels on wall. Having the hands higher up helps taking the weight back onto the legs and feet, which helps with keeping a neutral spine so that the work can be focused on straightening the legs, aka working out these hammies! Credit bodypositiveyoga.


Stay in the pose as long as you can maintain the right alignment, then rest in child’s pose. Repeat twice for a total of 3 times. Finish in child’s pose with the forehead resting onto the floor or savasana for a couple of minutes.

As usual, happy to take comments / suggestions / feedback! Let me know if you tried it, and if you liked it! Also if something doesn’t work for you it’s always interesting for me to hear it and find out a way to make the pose work for you.


Light on life, chapter 2: stability – by Rebecca Lerner (Day 1)

This weekend I went to a workshop at the New York Institute with Rebecca Lerner. The theme of the workshop was the chapter 2 of Light on life, which was great for me, as I often lack in stability compared with flexibility. Also, light on life is my favorite yoga book and very high on my list of favorite books, and it was the first time I heard of someone having a workshop centered around a chapter of that book, so I was pretty excited.

There were three sessions: standing poses with a special attention to twists (Day 1), restorative & pranayama (Day 1), and finally arm balances and backbends (Day 2).

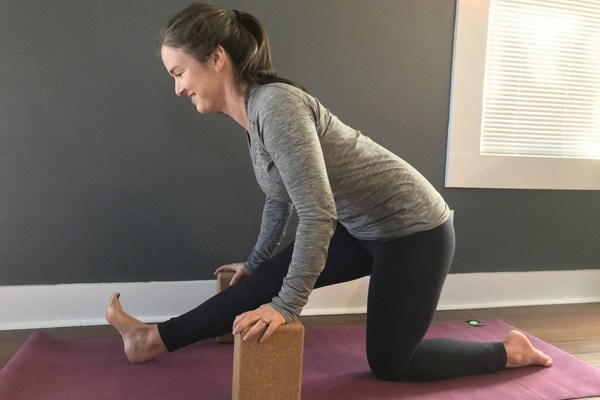
We started the standing poses session by working on parsva adho mukha virasana. Keeping the stabilizing arm (right arm while turning to the right) bent, extend the other arm as far forward as possible. Use your hand to help the belly to turn further, then extend again, and finally extend both arms. This created a very intense twist that one might not think possible in parsva adho mukha virasana.

Parsva adho mukha virasana with the stabilising arm bent by szkolajogi

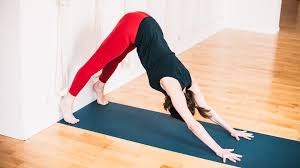
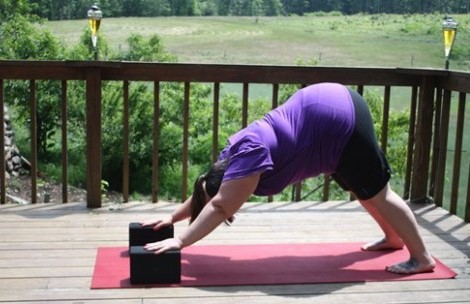
After doing both sides two or three times, we went back to the center and up into Downward Dog. All following poses were stepped into from downdog and we changed sides sliding through prasarita padottonasana with a short rest with the head down. Rebecca mentioned that staying low would help both maintain the energy levels and help with the grounding and stability of the asanas.

The sequence itself was quite classic: parsvottanasana, parvritta trikonasana, parvritta parsvakonasana, parvritta ardha chandrasana. But the focus was on the revolving action, especially the turning from stability in the legs and the hips. She had us touch our hip bones and use our hands to give the right directions to the legs and the trunk. For exemple in parvritta trikonasana, she made us give the direction of inward rotation at the front hip bone to soften the abdomen and allow turning the chest from the stability in the hips. She mentioned that if this slight inward rotation was there, there would be no swaying of the hips on either side while we tried to turn. Furthermore, in all these poses she had us use our hand flat on the floor (as much as possible obviously, if you needed a brick you could use one) and stamp the heel of the hand down. I found it particularly helpful to work that way in terms of stability and connectivity for the shoulder.

Parvritta Parsvakonasana by BKS Iyengar

We then proceeded to sirsasana. There was much attention brought to the positioning of the hands; it seems we are often overcompensating the clasping of the hands and inward rotation of the wrist / lower arms. She had us clasp the hands but not so much that the thumbs would be crossing, simply resting on top of the index fingers. I had my small “yes!!!” moment when she mentioned bidirectionality in the arms, that we are used to going from the elbow to the wrist, but that we also need to learn going from the wrist to the elbow. This change in the hand position seemed to be very strange for most people and quite impactful, but I had been practicing that way for a while now, so it wasn’t a big shock to me. It was more of a shock that the way I was practicing headstand was seemingly not the “taught” way anymore; apparently along the way of home practice I improved (?) or at least let go of thing not serving me. I think at some point I was bringing in my elbows to close by in headstand which was creating issues with my neck, and when I went away from that my grip on the hands changed. I have also been practicing changing hand positions while in headstand quite a bit (I started doing that when I realized most of the weight was on my head anyhow, I could keep my shoulders lifted, and balance quite easily) and I believe that has improved my alignment, or vice-versa. Sometimes you’re really not sure of which came first…

We also practiced a few poses which are not in Light on Yoga, which was quite interesting. Rebecca mentioned that many poses didn’t make it into the final cut of LOY, as otherwise the book would have been too big and too expensive. We practiced two of those poses in headstand: parsva parvritta eka pada sirsasana (like parsva eka pada sirsasana but with the foot on the floor going to the direction of the foot still up, so if your right foot is touching down it would cross the midline towards your left) and akunchasana / parsva akunchasana: knees bent and thighs touching the chest, then swinging the knees to the right, staying and to the left, staying. My abs still remember this pose… But it was very interesting and I’m definitely gonna work on this pose more at home.

akunchasana

The only picture I could find of akunchasana, not sure where the credit is due, please let me know if you know…

Finally (I think, I’m not so sure anymore about the timeline) we finished the morning with mulabandhasana sitting on a bolster, then going into vamadevasana I from a kind of wide knee vajrasana. I was actually very surprised to see I could do this, as I had never even attempted that pose before! I had no idea where we were going and just found myself in the pose, which was a great beginner’s feeling I hadn’t had in a while.

Vamedasana I by Jack Cuneo

Speaking of which, there were lots of talk about aparigraha and not coveting the neighbor’s pose and staying safe, in particular with all of these knee-heavy poses, which I thought Rebecca was very elegantly bringing into her teaching.

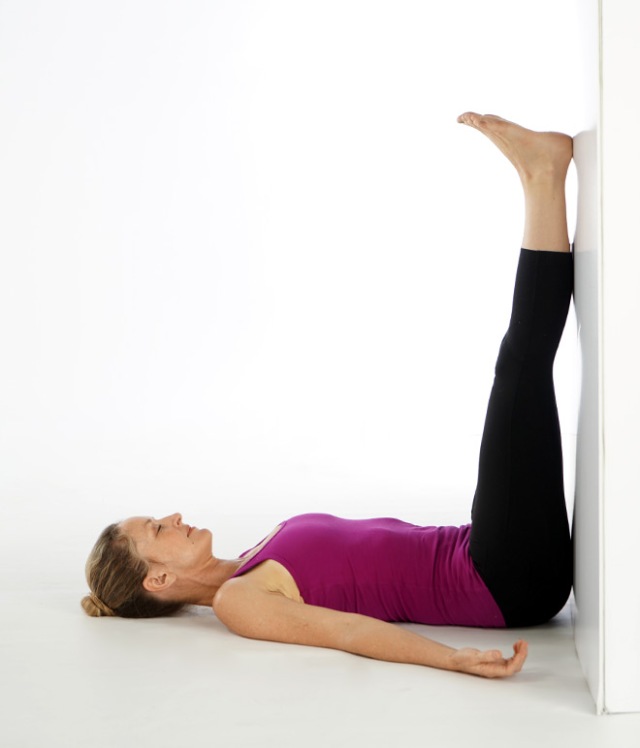
After a short viparita karani, we went for lunch, and reconvened two hours later for some digestive poses (supta virasana and supta badakonasana), shoulderstand and variations (we also practiced akunchasana / parsva akunchasana among other variations here, and Rebecca showed us how all the turning in parsva akunchasana was a great preparation for parsva sarvangasana as it enables us to bring the supporting hand really nicely under the tailbone. She also mentioned we could work on extending the legs in this pose using a chair to support the feet, which I’m really looking forward to work on at home). After this, we started pranayama, first lying down in supported savasana, then sitting, and we finished in prone savasana.

I always feel very inadequate writing about pranayama, as I feel very “meek” (Rebecca’s / Mr Iyengar’s words) in that practice. I do not practice pranayama very regularly. I feel guilty about not doing it more often, and I have started working on it a bit more (I even opened Light on Pranayama and read through some passages in the past few weeks) but I still feel very uncomfortable about giving pranayama instructions. However, I was surprised as I could easily sit through the whole session without fidgeting, which is definitely an improvement since teacher training. I guess all this sitting I’ve been doing is starting to bear its fruits. As for the pranayama itself, the only thing I will say is that we focused on keeping the chest bone / sternum lifted, and in particular lifted not only up (towards the head) but slightly forward (towards the front of the body) on the inhale.

Last night I dreamt of yoga

I don’t know why, but last night I dreamt of yoga. Well, asana. I dreamt I was practicing backbends. I was easily getting in Rajakapotasana (King Pigeon pose) and it felt great.

Rajakapotasana (credits go to Sandy Blaine)

It’s quite interesting because I don’t think I have ever even attempted to do this pose. But in my dream, my feet reached to my head so easily, and my back felt amazing.

Image result for rajakapotasana iyengar

I also did this variation in my dream. (BKS Iyengar, LOY)

I think I remember I could do this quite easily as a kid. Which is quite interesting, because I wasn’t a flexible kid, funnily enough. I couldn’t do the splits, I couldn’t put my foot behind my head, and all of the “crazy” things that sometimes come naturally to children but we lose as we age, I couldn’t do any of those. I was terrible at cartwheels, and not great at gymnastics in general. I was always, however, a dancer. I’ve got good rhythm and moving my body to music feels very natural – and I often surprise people that way (as I am relatively shy, people are often floored to see me dance unrestrictedly).

I think it’s the first time I dreamt about yoga. And to be fair, I’m really wondering why now. Maybe it’s because of the Iyengar Centenary Celebrations in Pune, that I keep on seeing pictures of and wished I could have gone too. Maybe it’s because I miss my Dutch Iyengar community, as I’ve found it really hard to integrate in the one here in NYC, partly because I just don’t manage to make it to class, and partly because it feels a bit more closed up than the Utrecht / Dutch community.

Image may contain: 15 people, people smiling

The Dutch contingency at yoganusanam 2018

It’s also interesting because even though I have not been to classes recently, my practice has picked up again. My handstands are finally somewhat stable when free-standing, I can lift up in Lolasana (with blocks) and do a L-sit* (with a belt, but still it proved to be that my arms aren’t so short that I can’t do a L-sit, and taught me a whole lot about where my butt needs to go if wanna have a chance to do it without). I’ve started considering taking the Junior I exam again, either going back to the Netherlands for it or taking it here – where I know that I will clearly have less chances of passing, as interestingly the way of teaching is different from the Netherlands in subtle, but real ways.

In a way it’s funny to think about the assessment. I understand why the assessments are so rigid, but as the teaching is different here and in NL, it sometimes makes me feel really awkward as “a teacher” that things are done this way (here). For exemple, I’ve learned  how to get in headstand (Sirsasana) away from the wall by drawing my knees to my chest and slowly using my core to lift up my legs, until my knees are up to the ceiling, after which I can stretch the legs up. Here, I should teach getting into headstand by jumping the legs up and back until the feet are on the wall, and from there stretch up one leg after the other. I had never seen anyone get up that way before I moved here.

I don’t know if one technique is better than the other, but I know that if I taught “the Dutch way” at the assessment here, I would likely not pass. And of course it’s not only for one pose that these subtle changes might be an issue. On the other hand, I don’t *really* care whether I pass or not, I kind of just want to take it to see how my practice has evolved. Still, I also don’t want to take the exam knowing I will fail, and lose everybody else’s time.

Another issue in terms of teaching, is that I don’t have all the material that a studio usually has at home. In particular so far I was missing a chair (which I will get for Christmas, yay!), but I also don’t have ropes, and not really enough blankets or blocks if I have more than two students. Which is annoying, especially when on my syllabus are poses like Dwi Pada Viparita Dandasana (and a certain way to do the pose once again).

Shoulder stands - dangerous? : yoga

Supported Dwi Pada Viparita Dandasana. Credits

Anyways, I am a bit uncertain about what to do. Since yoga isn’t my primary occupation, I sometimes feel guilty of not practicing and/or teaching more, but my practice has to stay sustainable while living in a large city, with a demanding job, and spending time with my loved ones. I think I might take a plunge, pay way too much money for a couple of private classes with Lara Warren and ask her opinion about it all.

Meanwhile I will be happy for my friend and early-morning-yoga-partner Tally who took and passed her Intermediate Junior I exam brilliantly!

*I don’t think this is an “official” asana, though the word “Bramcharyasana” keeps on coming back when I search for it. Though I guess it is practiced as jump through / jump back transitions in sun salutations?

If it fits, I sits

In case you don’t know the meme…

My practice has changed, recently. Or rather, my home practice. I’ve been getting up earlier, and if we don’t have a guest home (which is pretty rare at the moment, as it seems every single person we know has decided to come and visit us in NYC – not complaining) I go to our second bedroom and go through a couple of sun salutations, handstands / forearm stands and diverse standing poses before breakfast. It’s a very short practice, usually 15-30 minutes just to start the day right.

My main practice happens in the evening, when it happens at all. I wasn’t expecting my job and commute to be so tiring, and often once I have cooked dinner I only want to sit in the couch and watch something with my boyfriend. Luckily, he often has more energy than me and goes to the gym, which leaves me with some time to dedicate to yoga.

Even so, my practice recently has revolved a lot more around restorative poses and sitting. It’s funny for me to reflect on, as when I started yoga I only wanted to do the “fun” stuff like arm balances, backbends and inversions, especially at home. Now I keep these for the weekends when I have more energy, and try to get to a workshop to compensate my lack of classes during the week. Don’t misunderstand me, I still absolutely love these more “physical” poses. But in my home practice right now, they’re not a priority. I’m too tired and I don’t want to practice poses which will give me energy and prevent me from sleeping.

I remember some years ago, I had a period when I was working really hard to “get” padmasana. I would sit in half-lotus and twist, and catching my foot and twisting would feel amazing for my back, though my front hip would kill me.

parivrtti ardha padmasana

One of my favorite poses from then and now, though the twist doesn’t feel as good anymore.

I spent a lot of time and effort working on padmasana, until I finally “got it”, interestingly I think mainly because of standing poses work and understanding how to turn the front leg in trikonasana (I’ve got lazy thighs who don’t want to turn out).

Then of course I did something stupid, injured my knee, and started from scratch. Now, I can do padmasana, but it feels far from “comfortable” to sit in padmasana (not that it ever did even before I injured my knee), and any pose with hip extension + padmasana is excruciatingly uncomfortable.

This is very much ouch. 

Actually there are very few poses in which I have issues breathing (for exemple I have no issues in backbends like ustrasana or urdhva dhanurasana), but padmasana is one of them along with urdhva hastasana. I sometime even get close to panic while in padmasana, though it stops as soon as I uncross my legs. I’m still unsure why that is.

I find it really interesting that padmasana is such a hard pose for me (though I know I’m not the only one). I was teaching it the other day, and all 3 students in the class got into it on the first try with relatively limited preparation (I was teaching it from having legs up the wall, and I had planned to stop at ardha padmasana, but when it seemed so easy for them I gave the full pose a try).  As I’m one of these very-flexible-possibly-too-flexible-can-overextend-tend-to-work-from-flexibility-not-strength people, having “stiff hips” helps me relate to my students with short hamstrings.

Anyhow all of that to say that even though I am working on being able to sit in padmasana for longer periods of time, as this point it’s still very much uncomfortable, and so I am learning to appreciate sitting in ardha padmasana and sukhasana. I even have the feeling of rediscovering these poses, and how quietening it can be to simply sit down. So I sit in sukhasana, palms on  my knees, close my eyes and breathe. I’m not even trying to do pranayama at this point – I just sit and breathe. And it helps. It’s different from my yoga practice used to be, but it’s still yoga. And it’s still me. I just… changed. And the practice changed with me, to accompany me better in this new chapter of my life. It’s ok that I’m not doing inversions every day at this point. I’ve struggled with accepting that, as inversions are the central pillar of Iyengar yoga practice. But I genuinely think I’d better sit and breathe rather than not do anything because I’m too tired to do headstand and shoulderstand. It’s not very yogic to guilt-trip myself, is it?


How to reinvent the wheel, huh, the shoulder jacket

If you’ve been doing Iyengar yoga for some time, at some point or another you will have encountered the infamous shoulder jacket. Whether you’ve had shoulder / neck issues in the past, or you simply went to a workshop where the teacher was working on that region, the shoulder jacket is an easy way to help your posture by relaxing your neck muscles and bringing the shoulder blades close by each other.

A shoulder jacket can easily be made by using a long belt. You can find the description (and many more options for using belts and ropes to help your shoulders) in Lois Steinberg’s Iyengar Yoga Asana Alternatives: the Neck and Shoulders. A short description so that you can try it at home even if you don’t have the book:

  • take one handle of the belt in each hand.
  • bring the belt to your back, with the center of the belt on your spine, and one side of the belt going through between your arms and the sides of your chest. Repeat the other side.
  • the belt should be just under the armpits, with the belt’s extremities in front of your body.
  •  now bring (well, I “throw over” but that’s not very yogic) the belt’s extremities over your shoulders so that they are in your back.
  • cross the handles so that your right hand holds the originally left handle, and the left hand holds the originally right handle
  • make sure that the belt is not cutting through your skin, especially under the armpit, and that the part over your shoulders is on the bulky part of the trapezius muscle, not the bone.
  • pull the belt handles down. You should feel the shoulder blades going towards each other and the chest lifting. The downward pressure on the the trapezius should help relax them.

Strangely, I could find very few pictures of the shoulder jacket online. Intellectual property rights? Or is this gem an unknown secret shared by the Iyengar community? If so, I’m sorry, I didn’t get the memo. Please don’t remove my certification!!!! Joke aside, you can bring the crossed belts in between the belt and the shirt, or over – if you’re not helped by someone like in this picture it can be a tad tricky. Also, I would bring the belts on the top of the shoulders closer to her neck.  

While I was looking for the source of that picture, I found out it actually comes from this video where a shoulder jacket is used in down dog. It doesn’t need to be used with a partner, you can simply stand in tadasana with the shoulder jacket and pull the ropes down yourself.

Also, I don’t know if it’s me, but I’ve seen this “buckling” of the belt forward on multiple pictures, and while I understand why people do that, I feel it defeats a bit the purpose imo. I think it confuses the direction of the action. But maybe that’s just me – at this point sometimes I feel things and have been working on feeling the skin direction and such subtle aspects, but I’m a bit uncertain of whether what I’m feeling is correct or not.

Anyhow if you want to do standing poses (or other) with a shoulder jacket on, by all means do so, but I would advise to use a slightly shorter belt that can just hang, or a different version of the shoulder jacket. In that version, you make a large loop in the belt, step in the loop, position the belt on the back / under the armpits as in the previously described version, and bring the part of the belt in front of you over your shoulders. You now have a loop hanging in your back. Bring it in between the belt that it perpendicular to your spine and your shirt, adjust, and pull down. This should keep the belt in place as well as the imprint, without having a tripping hazard.

So. Did you try it at home? Is this your favorite thing ever? Do you talk about it to everyone you meet and their neighbor? Well, I’ve just saved you $30. Yep, I couldn’t believe it when I saw an advertisement for this product online today. A shoulder jacket is a better version (though admittedly probably less comfy) of this product, and a belt, if you’re not hang up on getting an Iyengar belt, can be as low as $5 (on Amazon, not sponsored) – and you can use it in so many other ways! True, you probably won’t go hiking with your yoga belt (even though…) but if you use the shoulder jacket everyday, even for 15 minutes, I guarantee you will see improvement in your posture.

Serendipity

Have you ever wondered if your yoga teachers talk to each other at the beginning of the week and decide to work on a specific topic? That’s what I thought for a while as it regularly happened that my teachers had the same focus in class in the same week.

Once I become a teacher myself, and taught at the same studio, I realized this was very obviously not the case. So how did it happen that the teachers were somehow still focusing on the same teaching point at the same moment?

I still don’t really have an explanation for this, apart from it just happens. Of course, in Iyengar yoga there is a four week cycle, with the first week for standing poses, second for forward extensions, third for backbends and last week restorative. However there are so many poses, ways to link them, and possible teaching points, that this barely limits the teaching options. If you’re wondering why this rotation exists by the way, it is to ensure that students coming only once a week work on all types of poses evenly.

Yesterday was an amazing exemple of this serendipity at work. Last Wednesday I was practicing at home, working on some ways to introduce shoulderstand (Salamba Sarvangasana) to a student with a shoulder issue. I ended up in a Halasana with my shoulders high up on a bolster, and the pose kind of screamed for me to try and do Chakrasana.

If you don’t know what Chakrasana looks like, it’s a backwards roll from Halasana to downward facing dog. The only time I had previously been taught this at length (and somewhat managed to do it) was during a workshop with Garth McLean. But I hadn’t worked on this in months, and in the meantime had some neck issues any time I was holding long shoulderstands, so I was also unwilling to practice anything that looks like you’re possibly gonna break your neck.

Anyhow, I managed and was pretty happy about it, but this was highly propped up, and I was really wondering how I would transition from that to the floor (or at least much closer to the floor).

Well, yesterday, as I went to Lara Warren’s level 4 class, she announced that the focus of the class would be… you guessed it, Chakrasana! I don’t want to get into the details of the class, but by the end of it I had understood something in the lifting of the trapezius muscle in Halasana, and I didn’t feel stuck in that transition anymore. I need to work on this a bit more, but I managed to do Chakrasana on the floor for the first time, without feeling my neck at all.

Really interesting how it just happened to be that class’s topic, when I had just started working in it, and had not done so in a very long time. Maybe it’s an untold benefit of being an Iyengar yoga teacher noone tells you about, a manifestation of “when the student is ready, the guru will appear”!

Yoga citta vritti nirodha

Yoga is the stilling of the fluctuations of the mind.

I’ve been thinking about what yoga truly is recently, and I guess especially the state of samadhi (which I will translate here as meditative consciousness or one-pointedness of mind).

Now, when we refer to yoga or what most people think of as yoga nowadays is actually only one of the eight petals of yoga, asana, aka the postures. The eight-fold path or ashtanga yoga (not to be confused with the hatha yoga style developed by Pattabhi Jois) is often represented as a tree like below:

Credits to shaktianandayoga

But I have seen other representations such as this one:

Patanjali’s 8 Limbs of Yoga Study Chart | Daily Cup of Yoga

I am personally not a fan of this second representation because it seems like it is an order in which you do things, so if you have achieved yamas and niyamas you can start asana*, once you achieve that, you start pranayama, and so on until dharana, at which point if you practice enough dhyana will happen, and if you get to dhyana often enough, then samadhi will be bestowed upon you.

Guruji BKS Iyengar has “debunked” this linear progression many times. The limbs are intertwined and you can practice every single aspect during your asana practice, for exemple during asana practice your breath should be soft and controlled like in pranayama, your awareness should be spread all throughout your body, you should not harm yourself, etc etc. I remember he also wrote about Gandhi being a prime exemple of what can be achieved with a strong ahimsa practice**, though I do not think Gandhi ever called himself a yogi. The tree imagery represent much better how the different limbs are interconnected, and it’s not like once you have roots, a tree stops growing roots to grow its trunk; on the other hand a tree keeps on growing in all directions, roots, trunk, branches, leaves, flowers and fruits, all at the same time (at least if it’s the right season ;).

Anyhow back to the topic of what I actually wanted to write about. Samadhi. I sometimes have glimpses of what I believe Samadhi must be like. This only happens to me during headstand practice, and not always, sadly. Some days I am just struggling to stay back up for 5 minutes. But some days, I manage to settle in the pose and stay there in a state of what I can only describe of effortless effort. I am lucky if this happens for a full minute. However this made me wonder about senior teachers. Though I have never met Guruji, based on what I read, I do believe that especially in his later years, he was in a constant state of samadhi, whether he was practicing asana or not. So I wonder about the senior teachers: are they in a constant state of samadhi? Do they only attain it during practice? Is what I think of as being samadhi actually samadhi? It does certainly feel like yoga in terms of cessation of the fluctuations of the mind. But then again, if I practice in a class setting I am likely to get corrected on my headstand, so is it possible to attain samadhi in a somewhat imperfect headstand? If by any chance a senior teacher (or anyone else, really, but if a senior teacher comes by, please please please comment) reads this, I would love to hear your thoughts on the topic.

Meanwhile, I finally invested on the Astadala Yogamala anthology, so I’m sure many more questions about yoga will pop up as I go through the material.

36975127_2169517076396221_3565016163568058368_o

* Though I sometimes wish that yoga practitioners would “practice” yama and niyama before starting an asana practice… or at least have an idea of what it entails. So many people thinking yoga is just stretching :\ /rantover

**I believe this was in Light on life, but might be in Tree of Yoga.


Bonus tip: I finally made it to class, and I learned this amazing tip for backbends on the chair, the one where you curve over the lean of the chair towards the wall, with your feet on the legs of the chair. While you are reaching your hands down on the wall, stop for a moment where you are, and try to sit back on the chair (without moving your hands from where they are on the wall).  Then go back to walking your hands down on the wall, rinse and repeat, so that you’re basically oscillating in your backbend from more weight on your feet to more weight on your hands. Boy if that’s not a deep back opener, I don’t know what is!

Weekly Update: What's Been Going On At The Blue Osa Eco Resort

I’m talking about that one, whose name I’m not sure about. I’d say Chair Urdhva Dhanurasana, but usually that refers to coming up to Urdhva Dhanurasana from having your back on the seat of the chair like for the Introductory syllabus, so if anyone knows the “proper” name please let me know below. Image courtesy of blue osa


Workshop with Manouso Manos – Day 2

After ~40 minutes of Q&A (Manouso mentioned one should always have at least 20 minutes of break between Pranayama and Asana practice), we moved on to Asana. It was a very long session (I believe around 5 hours, from 11:30 till 16:30), so I’ll try to stick to the main points. I think they were two main messages which were : dare, and have fun doing it. And a possible addendum: no props! We started with jumpings, which was killing us, but also a lot of fun, and took the seriousness out. Then we did standing poses (Trikonasana and Parsvakonasana), repeating them many many times, with a focus on rotating the chest to create a backbend. Ultimately, he has everyone get their palm flat on the floor. Many times through the class he was getting back to Light on Yoga and/or Art of Yoga to show us details of Iyengar’s poses. In this case, I learned that in Parsvakonasana the hand on the floor is actually behind the foot, with the thumbnail touching the middle of the heel. We also did Ardha Candrasana, and he had us move our hand from being in line with the little toe, to being in line with the big toe, to setting the palm of the hand flat on the floor. Challenging to say the least; I could feel my leg muscles burning – at that point he mentioned that strength is required for balance : working on it!

Image result for parsvakonasana iyengar

Iyengar’s Parsvakonasana – notice how the hand is much more back than what we usually do!

We then worked on the pose I always forget to teach: Prasarita Padottanasana. He used this pose to learn more about inversions, so we did twice in “reverse order”, so that the first time we did the forward bend with head on the floor “headstand-style”, then we did headstand, then we did Prasarita lifting the chest up “shoulderstand-style”, then we did shoulderstand. In both Prasaritas he had us line the wrist with the heel.

In the first version, he used the side picture in Art of Yoga to show exactly how round the back has to become, so that not only the crown of the head if on the floor but also the back of the crown of the head is on the floor. Manouso demonstrated the pose and showed us not to lift the shoulders up with all our might, and not to bring the elbows too much towards each other (and writing this I can really see how much of an advanced group of students it was: it’s the exact opposite instructions to what we give to beginners!). He also mentioned bending the thumb slightly to extend the part of the palm at the root of the thumb and the hand line.

Image result for prasarita padottanasana iyengar art of yoga

“headstand-style” prasarita padottanasana

But as I already mentioned, this was to explore Sirsasana. We didn’t stay long in any of the inversions, as he said he’d rather have a good 1 minute headstand than a bad 20 minutes one where we only stay in the pose out of willpower. Once again, I already mentioned this was a workshop for advanced students. With that out of the way, he instructed us to start bearing more weight on our head and less on our arms and hands. Manouso explained that as a beginner, 90% of the weight should be on the arms, 5% on the hands and 5% on the head. However, with practice, as the neck muscles grow and become stronger, the weight should gradually increase on the head until 90% of the weight is on the head, 5% on the elbows and 5% on the hands. Ultimately, in the headstand variation where you are standing only on your head, you have 100% of the weight on your head, and apparently Guruji said to him once about this variation that he was doing it to “balance the four lobes of the brain”. Manouso explained that we can only stay in longer headstands if we can move the weight to our head. Interestingly, this is something I had somewhat gathered myself from self-practice, as I now regularly do 10+ minute headstands. While I still carry a considerable amount of weight in my arms and hands, I started doing regular arm variations in the middle of the room, and this forced me to bring more weight onto my head as I need to move the arms around.

For the second Prasarita, he had us line the heel of the hand with the heel of the foot again, and straighten the arms even if the heel doesn’t touch the floor anymore. The focus was on lifting the chest and creating a back bend in the thoracic area from using the arms – and yes, it was hard. But not as hard as what we had to do next.

Image result for prasarita padottanasana iyengar art of yoga

“Shoulderstand-style” prasarita padottanasana

For coming next was shoulderstand, which we did three versions of. We started with the regular shoulderstand. Then he had us partner up to use more blankets under the shoulders, and had the partner place a rolled blanket under the elbows. This was all so that we would learn to lift from the upper back and come more on top of the shoulders, and use less of our hands. Manouso said the hands are just there to give an upward direction – and not the whole hand, pretty much only the index finger. He had us remove the hands from our back as well. This felt very much like unsupported shoulderstand, which I prefer, so it was great. For the third version, I’d like to remind everyone once again that this was an advanced class. He had us remove all props, even the mats, and had us do shoulderstand with no support, with the fingers interlaced in the middle of the back and thumbs to the sides of the chest. We didn’t stay long, but I felt it was surprisingly great for the neck, and Manouso confirmed a short hold of this pose and help lengthen the neck.

Image result for salamba sarvangasana iyengar art of yoga

No belts, no mats, no blankets 

We finished the class with forward bends and twists, and to be honest I was getting exhausted by that point. We did multiple versions of paschimottanasana and janu sirsasana – for that one I learned that the buttocks of the bent leg is actually lifted up -which, again, you can actually sort of see on the Light on Yoga pictures. We were instructed to open up the legs in Upavista, then bend the knee so that the heel is at the inner groin. From there, using our thumbs, we rolled the heel out. Then press the hands down in front of you to lift the buttocks up (I had no strength left by that point and I felt very heavy!), and only let the straight leg buttock go down to the floor.

Image result for janu sirsasana iyengar

Notice how the buttock is slightly lifted up and how far back is knee is?

We did a couple of other things, but I can’t remember anything else sticking out, and this post is already very long so I’ll stop here. Overall a great workshop where I could see just how much more depth there is to yoga, and it was both instructive and motivating to keep me studying!

A new year begins, resolutions & learning process

First of all, happy new year to everyone. May your 2017 be full of health, happiness, and of course yoga! And thank you to all of you who follow my blog, and contribute via comments whether on the blog or in real life.

I started this blog mainly as an outlet for my thoughts, not really counting on people being interested in what I write, but I am happy to see that the Iyengar online community sometimes drops by.

Being in my last year of both PhD and Introductory teacher training, life gets sometimes hectic, and I don’t have as much time as I would like to contribute to this blog. So, sorry if the posts are spaced out! The posting flexibility is what makes my blogging experience enjoyable.

Have you taken resolutions this year? I haven’t really, apart from going to the dentist and the dermatologist (due to past bad experiences, I really dislike going to MDs, but I need to get my teeth and my moles checked…). I tend to think that if you want to change something in your life, you shouldn’t wait until January 1st. As soon as you’ve identified the issue, find out what you have to do to resolve it, and do it!

“Yeah, right, if it were that easy, everyone would do it!” – is probably what you’re thinking. And I agree, sometimes it’s not that simple.

I’ve recently started thinking of the learning process in asana, and come up with this 3-step description:

  • Awareness comes first. You cannot correct a pose if you’re not aware of what you’re doing wrong, or that you’re even doing something wrong in the first place. For example, in Virabhadrasana II, many beginners let their bent knee “fall in”, putting a lot of pressure on the joint, but often they do not realize that I’m talking to them if I would just say “Bring your knee in line with your ankle”! So I have to ask them to look at their knee (thus bringing their awareness to the bent knee) and make sure that it is on top of the ankle.

    screen-shot-2015-08-02-at-10-13-36-pm

    The perfect Virabhadrasana II by a young Geeta Iyengar, learn why it’s so perfect at  Iyengar Home Practice

  • Then comes the technical knowledge, or the “how to”. Once you’re aware you’re doing something wrong, you need to know how to correct it before you can actually do it (duh!). Continuing with the Vira II example, it’s understanding that pressing the outside of the front foot down will bring the knee in line. Disclaimer: this is a gross description of what needs to happens for the knee to be in the right position, but usually improves a beginner’s pose immensely.
  • And finally, there is the ability to make that change. It is very well possible to be aware of a change you need to make and how to make it, but you’re physically unable to make it. Sometimes you just need to work on getting more flexibility or more strength in other poses until you can do the required action. Continuing with the Vira II example again, while everyone (?- at least anyone who would be doing regular standing poses) can press their feet down, someone with limited flexibility in the hip area might find it very hard to press the outside of the front foot without falling to the inside of the back foot / bending their back knee / letting the back hip come forward (take your pick).

In Iyengar yoga, we use props to facilitate the learning process at any of these stages. For example, we use blocks in between the shoulderblades to bring the awareness to the point they’re touching. A block between the thighs can be used to learn how to bring the inner thighs back. A belt can be used around the foot if you cannot grab your big toe with your fingers while keeping your leg straight (cf Supta Padangusthasana below). The props enable you to work and progress at your own rhythm, within your own capacities.

Now, read again that sentence in italics from the last paragraph. Doesn’t it also apply to your resolutions? To all these changes that you feel you should be doing, and you know how to do it, but feel unable to do. You wouldn’t quit doing yoga because you can’t reach your toes, right? If you cannot touch your toes, it’s an extra reason why you should be doing yoga. So grab that belt, and stretch your leg! And bring your practice outside the mat, use figurative props to help attain your goals. Divide your objective into steps, of which the first one is easily attainable, do the first step, ask for help if needed 🙂

supta20padangusthasana201

Supta Padangusthasana I with a belt (from yoga art + science)

One last tip. Sometimes it’s hard to know what direction to take or which problem to tackle first. I find that whatever comes up during Savasana and distracts me from my breath and going inwards is what I need to take care of in priority, especially if it comes back regularly. If you’re thinking about what you’re gonna have for dinner, well… maybe you don’t have so many issues that need to be care of and should just try to focus more. However, I’ve had cases when I needed to take care of bank or love issues, which I thought were not a priority, but were really distracting me in Savasana until I did something about it. Once I had fixed them, I felt so freed! I had not realized they were weighting me down by occupying brain space at the back of my mind, every single day.

What do you think about my analogy, and did I forget learning steps? Looking forward to your feedback 🙂