Releasing is an action

Caution: this post is about subtleties in Padmasana and variations. I assume you already know how to sit in Padmasana without pain, how to externally rotate your legs and keep space in your inner knee. Please do not attempt Padmasana on your own without guidance of a teacher, and always come out of any pose if you have pain, but especially in Padmasana, knee pain. 

I’m pretty sure most people who come across this blog think I am extremely flexible. I’d wager that one of the firsts adjectives that people associate with yoga teachers is flexible. When I started yoga, I didn’t feel flexible, but after practicing and teaching for so long, I have to recognize that I was already more flexible than the average Joe, thanks to years of dance classes and aikido in my youth.

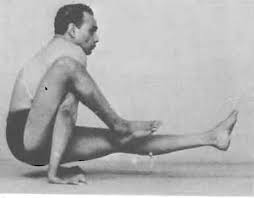
However, there is one spot in which I am not, and have never been, flexible: my hips. It’s gotten better with years of practice, of course. Yet my knees still fly up when I sit in Badakonasana when I’m not warmed up, and when I moved to NYC a few years ago, the first time teachers at the institute would see me in Supta Padangusthasana III they’d come over thinking I wasn’t understanding the pose. Nope, I’m really at my max…

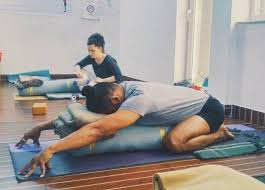
One of my favorite poses when I started practicing was Parivrtta Ardha Baddha Padmasana / Utthita Parsva Ardha Padmasana. I would feel a decent amount of stretch in my groin, which in the beginning made it so that I wouldn’t be able to stay in the twist that long, but reaching with my arm to catch my foot behind my back would give me the most pleasurable feelings in my lower back (don’t judge). With time, I would be able to stay longer in Ardha Padmasana, until I didn’t feel my groins so much anymore.

utthita-parsva-ardha-padmasana

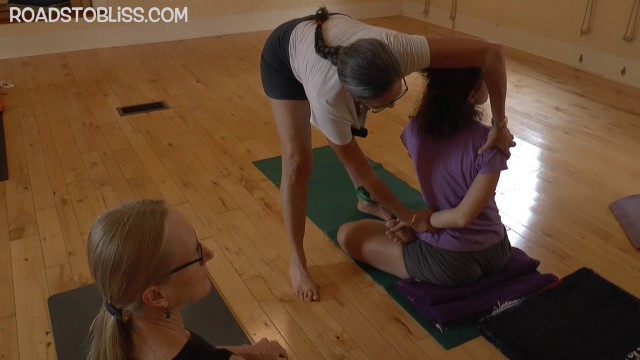
Utthita Parsva Ardha Padmasana / Roads to bliss class with senior teacher Rebecca Lerner

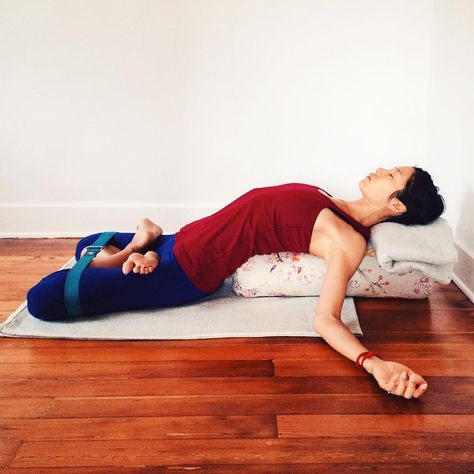
I had won a battle, but not the war. Sitting in full Padmasana was still out of my reach. For the longest time I would be able to put my legs in Padmasana for only a couple of seconds until I had to come out, my groins on fire. Then I could stay for a little longer, but started having difficulties breathing in the pose, to the point that being in Padmasana would almost trigger something akin to a panic attack. I realized that sitting on a blanket would help tremendously by slightly tilting my pelvis forward, and practiced that way for a good six months.

IMG-20181214-WA0003

Padmasana sitting on a blanket to help the pelvis tilt slightly forward.

Now it’s been a couple of years since I can sit in padmasana, still for relatively short periods of time. It’s not comfortable. I’m not ready to do pranayama in padmasana. My padmasana is still a loose one. And that’s all good. Do you know how sometimes you feel stuck and stalled, and suddenly you feel like you progress with leaps and bounds? That’s what has happened with me and Padmasana recently, or rather me and Supta Padmasana.

93841e74c8f18d65a37919bd78d5d16e--place-a-the-floor

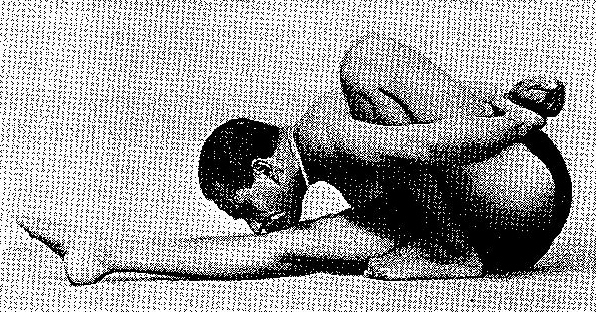
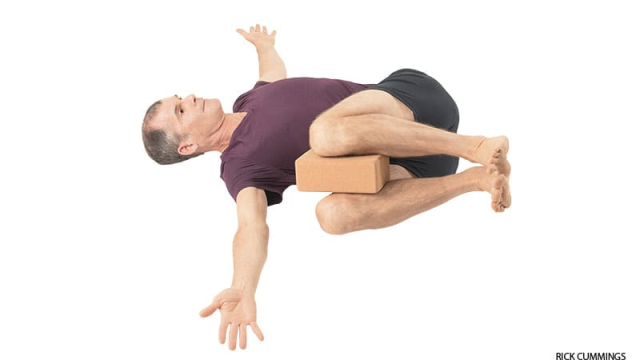
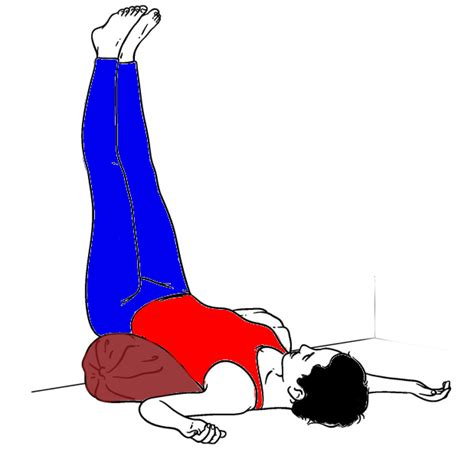
Supta Padmasana by Ellen Huang Saltarelli (I believe). For years even looking at this picture would make my groins wince, very unlike the blissful look people in the pose always seem to have.  

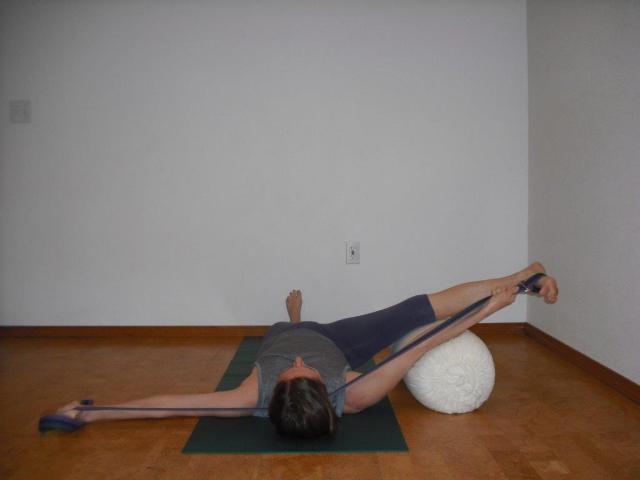
I’ve envied people who can easily get into Padmasana, not so much for the Padmasana itself, but Supta Padmasana. I see people lying in Supta Padmasana and they look like they found bliss. I lie in Supta Padmasana and all I feel is my groins burning. Let me correct that: I try to lie in Supta Padmasana and end up in a weird midway supported position where my hips are most certainly not in extension but a rather awkward flexion, with a bolster under my knees and one under my back, and yet after 30 seconds I have to get out. Supta Ardha Padmasana would hardly be better until a few months ago.

It’s quite fascinating; I was in a class with Patricia Walden pre-covid, which means it had to be in January or February of this year, and we did Supta Padmasana, or rather I attempted it and got out very quickly. So less than six months ago. Yet as I am now writing about Supta Padmasana, you must’ve gotten the gist that something changed for me. And yes, for the past few weeks something shifted and I am now able to lie in Supta Padmasana relatively comfortably for a few minutes at a time, with only a bolster under my chest. My knees are both resting down on the floor. And it all boiled down to the realization that is this post’s title: releasing is an action. I need to actively lengthen from my hip to the inner groin to bring my knees down to the floor, and when I do that, somewhat counter-intuitively, my groins do not hurt. It’s honestly life-changing for me, as I had thought and kind of resigned myself to the fact that I would never be able to have my hips extended with my legs in Padmasana.

Nuggets of wisdom

Hello friends, long time no see. I hope you and your loved ones are safe and healthy in these trying times.

I haven’t written in a while, mainly by lack of time. I luckily did not lose my job nor got sick, but the covid-19 situation has had me extremely busy. As my work did not shut down and I was deemed essential personnel, I would go into the lab 1-2 days a week and work remotely the rest of the time. This is still my situation today. However at the beginning of this my workload increased a lot as we were contingency planning, not knowing if the site would shut down and for how long. In parallel, I started teaching yoga on Zoom 1-2 times a week, and following classes online as well. With all that, there hasn’t been much free time to write until now. Oh, also, I hurt my wrist, still not entirely sure if was due to a strong arm balance practice, too much computer work, general tiredness, or all combined. It’s recovering but I’m off arm balances for a bit.

As I just mentioned, I have been following classes on Zoom. Mainly my usual Friday evening class with Patricia Walden, but also some classes with my NYC-based teacher Lara Warren, and I also participated in the IYNAUS Coast-to-Coast celebration for the 4th of July. I followed the classes from John Schumacher, Lois Steinberg and Gloria Goldberg.

Based on all these classes, I wanted to share some notes I made and statements I have been exploring. I didn’t write who said what, so I hope the teachers will forgive me for pooling their knowledge together in this post.

Without further ado, some statements and my commentary:

  • Bring the side ribs from front to back. Tadasana
    I tend to push my lower back and this has been tremendously useful to properly lift the chest up.
  • Bring the outer shoulderblades back. Tadasana
    This is also to help properly lift the chest without overdoing and tensing by pulling the shoulderblades towards each other.
  • Bring the outer knee in. Tadasana
    This is to help straighten the legs once the inner thighs are already facing each other and the feet are actively pressing down to the floor to bring the knee caps up.

  • Turn the feet out to support the pelvis. Prasarita Padottanasana
    Indicated for people on their period.

  • Bring the back of the ears to the ceiling. Adho Mukha Svanasana
    In order to bring the head down to the floor in Adho Mukha Svanasana, there has to be space between the shoulders and neck. The head comes to the floor from strongly opening the armpit, not banging the head down.

    LOY

  • Keep the hands in line with the shoulders. Jathara Parivartasana (also with feet to the wall)
    If the hands are too high the chest collapses even though it is easier for the shoulders (to keep them down to the floor).

    3. jathara parivartanasana iyengar - Google Search Yoga, Recherche Google

    Unknown origin

  • Press the foot on the wall. Krounchasana / Ubaya Padangusthasana
    I had already done Ubaya Padangusthasana with the support of the wall before, but it never dawned on me to use it for Krounchasana. I found it extremely useful to keep the leg engaged as well as lift the lower ribs up which I find one of the most difficult aspect of both these poses (not “breaking” throughout the back but keeping the spine in).

    Patricia Walden in Krounchasana. Beautiful.

  • Lift the straight leg up before lifting the buttocks off the floor. Eka Hasta Bhujasana
    OK so first let me say that Eka Hasta Bhujasana in this class followed Marichyasana I and I had never made the connection between the two poses before, I know, I know, it’s so obvious that Eka Hasta Bhujasana is just lifting the Marichyasana bent leg, putting it over your arm, and pressing the hands down to lift up. Never made the connection before so this was truly a “aha” moment, which is one of my favorite things to happen during practice. Anyhow, I find that bringing the weight back by lifting the straight leg up then forward when you lift the buttocks helps not cramping up as much in the quadriceps as if you were to lift everything up at the same time.

    Eka Hasta Bhujasana | Home Yoga Practice

    LOY

Finally, not so much a sentence but something to try: Tittibhasana with a belt around the ankles to help straighten the legs while avoiding sliding off the arms.

I’ll finish with one question for mask-wearing yogis; did you notice a change in your breathing when you wear a mask? I normally breathe through my nose, but I’ve noticed that when I wear a mask I tend to breathe through my mouth. Somehow it feels less restricting than nose breathing? I’m curious to hear if others have had a similar experience.

Also feel free to let me know what you think of these statements I noted if you get a chance to test them out!

The immunity sequence – evening addendum (covid-19 part 2)

I forgot Setu Bandha! Or rather, I filmed it, and then when I uploaded I was looking at the order of the morning practice and didn’t realize it is only in the evening practice. Anyhow here it is:


I’ve also been asked about the science behind and/or my thoughts about the immunity sequence. To my knowledge, this specific sequence has not been studied. However, I believe it might work through stress relief. Indeed, inverted poses in particular (which make up most of this sequence), have been shown to improve heart rate variability (HRV) which suggests an increased vagal tone and reduced sympathetic (fight/ flight/freeze) activity.

Even though the evidence is limited, there has been a few studies pointing towards this conclusion that might be of interest for the reader:

How to practice the immunity sequence at home – covid-19 special

Hi all! I hope you’re all healthy in this time of pandemic. If you are stuck at home or avoiding yoga classes because of covid-19, I made a series of videos showing how you can practice the immunity sequence at home.

Quesaco the immunity sequence? It’s a sequence designed by BKS Iyengar which is supposed to boost immunity.

My problem with it? Most of my students are unable to practice many of the poses in that sequence. So I’ve prepared a couple of videos, vlog-style, which can hopefully help them (and maybe you, reader) get the benefits from the practice, whatever their physical ability, while using whatever they have at home as props.

So here we go, let’s start with 5 minutes of supported uttanasana:


Then we continue with 5 minutes of supported downward facing dog:


Next is 3 minutes of prasarita padottanasana:


Then I will be repeating myself in the video, but if you don’t have a regular headstand practice in a class setting you might be better off simply skipping headstand. However I do give an alternative if you are young and healthy but new to yoga. Please note that you should not be practicing inversions if you have untreated high blood pressure, glaucoma, if you are on your period or if you have a shoulder or neck injury.
Finally, after 5 minutes of headstand comes 10 minutes of headstand cycle which I will no go over in the video as this post is meant moreso for beginners, and beginners aren’t gonna be doing 15 minutes of headstand.


Following headstand comes 5 minutes of supported Viparita Dandasana:


After this comes the Sarvangasana cycle, which lasts in total 20 minutes with 5 minutes of Sarvangasana, 5 minutes of halasana and 10 minutes of variations. Here are two videos; Sarvangasana beginners should only follow the first video while intermediate students can use the second video for help in halasana.


The last pose before Savasana is Viparita Karani (5 minutes):


I hope this was helpful; if so feel free to share with fellow students. Please leave a comment below if you enjoyed it, and if you have other set-ups or anything that might help other people in their home practice.

Stay safe and sane (at least as much as usual!).


Diving into the sutras

I’ve been lucky to get into Patricia Walden’s Friday class in Boston. It’s a level III-IV class from 5:30PM to 7:50PM, so quite the time investment on a Friday evening, especially as it’s a 40 minute drive from Waltham where I live, and I don’t have a car so it’s also a monetary investment to lyft* back and forth (or spend >1h30 in 3 different buses to get there).

She’s a great teacher, so it’s all worth the effort. The first half hour of the class is spend discussing the yoga sutras and/or the Bhagavad Gita. With the ordeal I go through to get to class, I usually dont have either book with me, and when I do we’re usually reading from the other one. I’ve learned to let it go.

Since there are no exams this year and I’m far from the new Level 2, I’ve decided it’s a great opportunity to learn more freely this year. In fact it has inspired me, along with the Friday readings, to spend more time studying the sutras.

So here’s my plan: read one sutra, its explanation in Light on the Yoga Sutras, and learn how to chant it, per day. I figure one per day is doable – knowing myself, I always want to do too much too soon and can’t keep it up. So one sutra a day, and I should be done with the whole book by the end of the year. Of course some sutras are more dense than others so we’ll see how that goes. I might have to spend two days for longer, more difficult sutras. Wish me luck! (and feel free to join in the experiment and leave me comments below! I am planning to give a monthly update on this project, but again, I don’t want to take on too much and get overwhelmed and quit so we’ll see if that actually happens!).

9780007145164: Light on the Yoga Sutras of Patanjali ...

Of course I started today with sutra I.1:


* Something that is not so well known is that Lyft is 100% carbon neutral as they offset all their rides and this is why I always ride with Lyft and not Uber. I also talked to the drivers and it seems they get about the same amount of money from both companies though Lyft is usually less expensive in my area so… win-win!

Only a Sith deals in absolutes

Hi! I’m not dead. I changed jobs and moved to Massachusetts, so I had little free time to write on here. But it’s calming down now so hopefully I can write more regularly again. I feel like I really need to get some thoughts out on the Iyengar method and the Iyengar system as a whole as I am growing frustrated with some issues which aren’t new, but that I keep on running into.

Let me get some things out of the way first: I love Iyengar yoga. I think it’s the best method that exists, it changed my life and I am forever grateful for encountering it and having the honor of being one of its students and teachers. There are some wonderful teachers out there, but I think as a community we need to have a hard look at some things we are doing and how we are conveying our teachings. I think the changes in the assessment system are a step in the right direction and that Iyengar yoga is slowly evolving to match the current state of the world, yogic and non-yogic. I am also excited to be travelling to Pune in July 2021 to study at the RIMYI (I registered a few weeks ago)!

rimyi-sign-full

Can’t wait to get there!

But seriously, what’s up with the shaming of students that happens around here? Is it also happening in India? Is it due to the frustration of the teachers? I get it, I too get frustrated sometimes, like when I demonstrate something and students are talking and then they don’t know how to do what I just showed. It’s annoying, and sometimes it shows.

Since I’ve moved to the US (2 years), I’ve experienced more shaming in yoga classes than I’ve ever encountered in my whole yoga experience beforehand. And I know I’m not the only one, as >50% of posts concerning Iyengar yoga on the yoga subreddit I regularly browse through are people reporting some kind of shaming that happened to them in class (usually, but not always, during their first Iyengar yoga experience) and asking if it is normal. No, no it’s not normal. Or at least it shouldn’t be. And it’s a pity that it’s their first experience of Iyengar yoga which might put them off forever, when there are so many dangerous headstand (among other poses, but definitely the most frequent culprit) pictures being posted in that subreddit…

Sometimes these posts are women being ashamed of being asked if they are on their period and put in a corner, which yes, there are reasons for, but we could still make the process a bit smoother especially for beginners – it is awkward when you are not used to it and you don’t know why everyone in the class needs to be informed of the state of your menstrual cycle. I try not to bring periods up unless it’s necessary and especially with beginners to explain why I do; for ex. in supta padangusthasana I ask the women on their period to bring their leg to the side as the leg straight up can create cramps due to the abdominal contraction. They know why they’re asked to do something, and I can quickly see if I might need to change my class plan if 80% of the students won’t be doing inversions. If it’s a student’s first time I will likely talk with them before the beginning of the class and ask about their cycle as well as let them know why I’m asking.

parsvaspg-300x225

Supta Padangusthasana II with belt – I couldn’t find a picture with the “New York hold” I talk about below.  Credits

But most of the shaming I’ve personally experienced is about the “right” way of doing something. And I think this “right” way of doing things boils down to two things: how you learned / who you learned from, and habit. Since I’ve had the privilege of studying in several cities / countries, I can tell you what is the “right” way of doing thing differs from institute to institute. For exemple in the Netherlands, I learned to come into headstand by slowly lifting my bent knees to my chest. In NYC, I had to jump into headstand. Teachers disagree on which method puts less pressure on the neck. Still in NYC, any kind of holding a belt is done with a folded loop so that the student doesn’t grip the belt but instead has “handles” to hold on to; never seen this in the Netherlands, or in Boston thusfar.

Vrksasana

Lordy, BKS has his hands together in Vrksasana! *surprised pikachu face*

And then this past Friday, I was in a class where the teacher asked “since when are we bringing the hands together in Vrksasana? and we don’t bring the arms up from the sides but straightforward like Urdhva Hastasana”. And I got seriously annoyed. Who’s “we”? Massachusetts practitioners? Why is it an issue? But above all, why don’t you give an explanation of what you’re trying to achieve in the pose and how the arms help with that? If it had been a teacher I knew better (it was my first class with that specific teacher) I would have asked more details. First, because in LOY Vrksasana is with the hands together, so it does bring something to the pose as well. If you have open shoulders like mine, you don’t need to bend the elbows to join the hands and it helps with the proprioception and sense of direction. Same with bringing the arms up from the side instead of straightforward, it helps me keeping the chest broad and I don’t lose much lift since my shoulders are open. I wasn’t the only student bringing the arms out to the sides or bringing the hands together, so I understand wanting to address the “issue” but why not making it a learning experience instead? “try both, see the difference in your chest lift and expansion” vs “we do it this way”. So dogmatic! I couldn’t help think about Star Wars then, thus the title of this post.

1090dc1fdc42e58d45dc1a374db6fbdb2292d5fcaba942aeddec8558b50a70b6

Anyways, I guess I’ve been feeling a bit like the black sheep of Iyengar yoga teachers in the US since teaching yoga is not my primary occupation (it was way more common in the Netherlands!) and I usually teach in less-than-ideal conditions: for exemple I teach a 30 minute corporate class where people wear jeans, and I don’t have props for my classes (apart from my trusty ol’ pal the wall!). So no fancy schmancy poses!

OK, rant over – I feel better getting that off my chest! /

(Iyengar) yoga is freaking hard

Yoga: union, or to yoke. What are you looking for in your yoga practice? For me, union is definitely the goal. Union of body and mind, that was what drew me in from my first ever yoga class. After not listening to my body for years, my mind got blown by how good it felt to feel my body, at home in my body. But getting there, creating more connection, that’s tough! While I do believe that Iyengar yoga is one of the best techniques to get there, I understand why one of my best friends told me that she wasn’t going to Iyengar classes anymore because it was too challenging and sometimes she doesn’t want to work that hard.

In Iyengar yoga, I’ve often heard that you’re a beginner for the first 10 to 15 years of practice. Students often laugh when they hear this the first time, they think it’s a joke. But it’s serious, and I agree with it. I still feel like a beginner, because I am still trying to make connections. And I’m not talking subtle things. I’m talking actually straightening my arms / legs and not overextending. I’m talking connecting the thigh bone into the hip socket. These are large connections which are sometimes still missing in my practice. I feel like only after these “gross” connections have been made you are not a beginner anymore, because you can start focusing on the connections of the soft tissues, internal organs, and the skin direction. Not that it’s completely separated; of course I already feel some of these things at times.

From August 19th-23rd I followed a course called the Wisdom Body, with Lara Warren and Nikki Costello. I could only join the afternoon sessions since I was working in the mornings (I was actually going to work before 7am so that I could be at the course at 2:30pm!), which were kind of “teacher training”. Or maybe I should say “continuing education” which is the name of this type of classes at the institute. Mainly people working on the Intro I-II syllabus, one other teacher working towards the Intermediate Junior I assessment.

It’s always humbling going to teacher ed. Of course, you willingly subject yourself to criticism so that your teaching improves. Of course, senior teachers are there to help you improve. Yet you have to be ready to accept the feedback, accept that your knowledge is limited, accept that you are really not that far along that yogic way. And usually your teaching is sub-par because you’re being watched and assessed. Yet these are some of the most useful classes I have ever been to, usually because when you teach, it becomes obvious what part of the pose you don’t understand, and the feedback you get is really on point.

I finally “got” Lolasana (which interestingly is the first arm balance of the syllabi). It’s one of the poses I had a hard time getting into, not to mention teaching: how do you teach a pose you cannot achieve yourself? It’s not impossible, but you need to understand the actions needed in the pose, which you can do from understanding which other poses it’s building on. This is how Matthew Sanford can teach standing poses incredibly well when he cannot practice them himself. Anyhow, some time ago in continuing ed. I was trying to teach Lolasana and it wasn’t working – I got some feedback which I didn’t really find helpful, and all in all I couldn’t teach it because I didn’t understand it. I started working on it with Light On Yoga, got better at it, and this week it was the first pose I tried to teach. Not only did it work, but the feedback I got made the pose so much clearer to me! The last pieces of understanding I was lacking suddenly got filled (for the curious: I was placing my blocks *hum, still T-rex arms here, hum* in front of my hips to “launch myself up” when really I should have had my hands on the blocks as in Dandasana and pulled my hips back!).

th

Mr. Iyengar in Lolasana, LOY

Anyhow watching the teachers preparing for Intro II teach, especially the silent demonstrations, there was so much for me to see. It’s hard for Lara not to “go into content” when assessing teaching, and I understand why. At my humble level I can already see so much about what they don’t understand about the pose, and it is clear why their teaching is difficult. Practice, practice, practice. Practice to understand the pose. Once you know the actions, show just that. A clear demonstration of the actions in the pose is better than a thousand words. So if the actions aren’t understood, how can you teach the pose??? It’s so funny for me to see how much I can see on others, when when I started teaching seeing aka observing was definitely what I found the hardest. I remember having to look at the Tadasana from my co-teacher trainees and not knowing what to look at. Now I look at people and their body tendencies everywhere, it’s a professional deformation at this point (my boyfriend even says I am obsessed with people’s feet…). Still, I know that it is easier to see the lack of action on other people than to feel the lack of action in my own body. So back to the mat I am, to deepen my understanding and give clearer instructions. ’cause that’s the reward in teaching yoga: when you see students making a connection.

What about you? Why do you practice? What was the latest connection you made?

A hamstring targeting sequence

Similarly to the low-back pain sequence, this was requested – though this time by students. It is also a relatively short sequence that can be practiced everyday, by anyone, and would take 15 minutes max. The goal here is to become more flexible and lengthen the hamstrings.

You will need: a wall, and a belt. Bolster and blocks not necessary but if you have them I will indicate where you can use them.

Start with your legs up the wall (viparita karani), no bolster under the hips. Press your heels up towards the ceiling and against the wall. Press the ball of the big toe up towards the ceiling. Open the back of the knee, knee caps “up” (towards your hip), bring the back of the thigh towards the wall. Relax the throat and tongue, hands pressing down into the floor by your hips (palms down).

Repeat 5 times with one or two breaths of rest in between (total around 3′).


viparita-karani-legs-up-the-wall-pose

See the space between the back of the thighs and the wall? You want to make that space inexistant so that the whole back of the legs presses against the wall. You can bring the palms of the hands down and press them into the floor.


Bend the knees and slide back towards the center of the room until you are in supta tadasana with both feet pressing against the wall. Grab the belt, bend your right leg and bring the belt over your right foot, then straighten the leg up. Both legs need to be straight, so only get the leg up to 90 degree angle if you can do so with both  legs straight. Otherwise lift the leg up as high as you can without bending either leg. Make sure your left thigh is also going down towards the floor (no gap between the thigh and the floor).


b0950520cc947b1c5ad7e713195041c7--yoga-iyengar-video

Supta Padangusthasana I with the wall and a belt. Both sides of the trunk are even, foot presses against the wall, arrows indicate directionality. Credit: https://www.iyengaryoganotes.com/


Change sides, 1′ each. Repeat both sides once. Repeat again, quickly bring the leg to the left over the midline, grab the belt closer to the foot and then bring the leg out to the left side (Supta Padanghustasana II):


2

If you have a bolster, you can use it for support as demonstrated here. If this is a very difficult pose for you bring the bolster closer to your outer hip. Credit: https://sunfloweryoga.net/


Keep both legs straight, left thigh presses down towards the floor. Stay as long as you can maintain both legs straight. Change sides. Bend your knees to your chest, roll out to the side and come up to standing.

Ardha Uttanasana with the wall (or blocks, 1′ or as long as you can hold it): this is a great demonstration, nothing more to add – please follow these instructions up to point 4! Use the blocks only when you can keep the chest lifted with straight legs:

ardha uttanasana with blocks.JPG


If you have time (optional): Ardha Hanumanasana (half monkey pose or half splits). Kneel onto the mat and bring your hips on top of your knees. Extend your right leg in front of you, heel on the floor – toes up, and slide the leg away from you. Straighten the leg by strongly pressing the heel down into the floor and bringing the knee cap up. Bring the chest slightly forward, back straight. Take support for your hands onto blocks if you have them. Stay 30 seconds up to a minute each side.


And finally, downward facing dog – Adho Mukha Svanasana with the hands up on blocks if you have them and heels up against the wall:


download

Downdog with the heels up against the wall, credits Kasia Zacharko.


modified-downward-facing-dog

Exemple of hands on blocks which you can combine with heels on wall. Having the hands higher up helps taking the weight back onto the legs and feet, which helps with keeping a neutral spine so that the work can be focused on straightening the legs, aka working out these hammies! Credit bodypositiveyoga.


Stay in the pose as long as you can maintain the right alignment, then rest in child’s pose. Repeat twice for a total of 3 times. Finish in child’s pose with the forehead resting onto the floor or savasana for a couple of minutes.

As usual, happy to take comments / suggestions / feedback! Let me know if you tried it, and if you liked it! Also if something doesn’t work for you it’s always interesting for me to hear it and find out a way to make the pose work for you.


Experimenting on myself

Today during savasana I had this realization that I was truly experimenting on myself. I never made the parallel to my day job to that extent before, and how I could rewrite Mr. Iyengar’s quote “When I practice, I am a philosopher, when I teach, I am a scientist, when I demonstrate, I am an artist.” by switching philosopher and scientist – I feel like I think and speak a lot more about philosophy when I am teaching or preparing teaching than when I am practicing. Maybe this reversal happens when a yogi’s more advanced than I am! Or maybe this is the influence of my day job?

Anyhow my home practice has changed. I practice a lot “by the book” or “with the book” now (Light on Yoga, obviously). What didn’t change is that I rarely practice pre-prepared sequences. I “go with the flow”. Interestingly I find that my body often goes against my brain and I end up practicing poses I wasn’t planning to do. Cause not practicing pre-written sequences doesn’t mean I don’t have any idea of what I’m gonna do; usually I have something I want to practice, either a “peak” pose, or a type of poses, and I sequence as I go. Today I thought I would practice backbends. I wanted to do a couple of vinyasas, then go to deep backbends like ustrasana and urdhva dhanurasana. But that’s not what happened, otherwise I wouldn’t be writing this blog post.

I did start with the vinyasas and my usual handstand / forearmstand practice (balancing away from the wall is getting much more stable, yeah!). But then I don’t remember why, but I did Malasana. And it felt great, but with my T-rex arms, I can’t bind my hands behind my back. So I was working on that, trying to see how far my hands really are with a loop in a belt (answer: VERY.), and I ended up pulling out Light on Yoga. This has been happening almost every time I practice recently. I believe since I cannot manage to get to class regularly, the book has become my teacher right now.

Related image

I really have short arms compared to the rest of my body – I measured them once to prove a point. I compensate with very open shoulders so I can do a lot of the binds; but arm balances like lolasana or jump throughs are terribly tough for me as I just can’t lift up very high.

I’m almost certain it’s physically impossible for me to clasp my hands behind my back in Malasana, but I’d love to be wrong – I have been wrong before about what my body can and cannot do, so…

Somehow after Malasana I ended up practicing more forward extensions, half following Light on Yoga and half what I was feeling like. Reading the explanation on Maha Mudra was very helpful, even though I didn’t feel as intense as when I practiced it in Continuing Education a few months ago (it’s on my syllabus. I was supposed to teach it, but we ended up just practicing it).

I also worked quite a bit on Marichyasana I, which I don’t think I had ever read the description for in LOY previously, shame on me. Between the reading and the studying the picture, I realized I was doing a couple of things wrong, like keeping both hips down on the floor and flexing my foot, which was preventing me from getting forward and touch my forehead to the shin/knee. I am pretty sure I had heard the hip thing once before, but hopefully now it will stick with me.

th-35

Twist only, hip is down, foot pointed

Marichyasana-I-Iyengar

Forward extension, hip is up, foot still extended. Sorry for the poor picture quality, I could not find any better.

As my practice ended  and I had mainly practiced forward extensions, I realized that my body knew better than my brain. My brain wanted to do the backbends and physically demanding poses, but it’s over 90F in NYC right now, and it was so hot that I took my clothes off to practice (reminder: this is home practice.) even with the ceiling fan on the highest setting. My body was much wiser and dragged me to a practice that was cooler, quieter, and overall really needed to refresh both body and brain. Sometimes you just gotta listen, your body already has the wisdom!

PS: happy 4th of July!


A quick, daily sequence for (lower) back pain

I just made this sequence for a friend of mine and thought others out there might benefit from it. If you do, let me know what you think! If you have suggestions and/or modifications, by all means leave them in the comments below.

This is meant to be a daily 10-15′ morning practice, but it could also be done in the evening, and could be quite easily shortened or lengthened depending on how much time you have. This sequence is OK for beginners, though you might want to check with an Iyengar teacher in your area first if you can; it’s always a good idea to check with someone who can see your body and who you can talk to directly about your history.

You will need a wall (and a bolster if you have one):
– start with supported supta padanghustasana using a wall:
1

Ideally the hip is against the wall / under the foot (90 degree angle) but if that doesn’t work out for you it can be at a smaller angle – this should be relaxing.

(both sides, 1-2 minutes each)

– ardha uttanasana with the wall, hip width apart. 1′, walk forward towards the wall, rest forehead, repeat. Hips on top of the feet, 90 degree angle between the chest and the legs. Bring the hips and thighs back (knee caps up!), lengthen the side chest. Keep the head in between the arms, inner upper arm goes up towards the ceiling.

2

– then Downward Dog with heels up on the wall and knees bent. Here you’re not working on straightening the legs / lengthening the hamstrings but rather on lengthening the sides of the trunk and bringing the hips up and back.
I would say hold as long as you can maintain the extension in the spine, so 30 sec to 1′, repeat 3x. Take child’s pose to rest in between, same amount of time. When in child’s pose, after resting, extend the arms forward as much as you can with hands in “cup shape”. On the last repetition you can also walk the cup-shaped hands to the right and to the left.

3

Imaginary wall behind her heels that she’s pressing into. Heels can be higher up and knees more bent.

4

Child’s pose with “cup-shaped” hands

(bolster / blanket not necessary but can be nice if you have them and then you can also have your forehead resting on them during downdog).

– Jathara parivrttasana, knees bent and resting down on the floor. If you have one you can use a bolster in between the knees. 30sec-1′ each side.

5

Use a bolster instead of the block (https://rickphoto.com/gallery/yoga/)

– Savasana (with bolster under the knees if you have one)

If you have more time you could add in “legs up the wall – viparita karani” either with a bolster before savasana, if you don’t have a bolster I would put it between supta padangustasana and ardha uttanasana.

6

Viparita karani with bolster (the bolster isn’t against the wall but a block’s distance away so that we buttocks have space to sink in behind it).

Disclaimer: I didn’t think I was going to publish this when I wrote this for my friend, and didn’t write down where the images are from. Google’s reverse image search is not being helpful. If an image from this post belongs to you, please let me know and I will credit you appropriately and/or remove it if you wish it so.